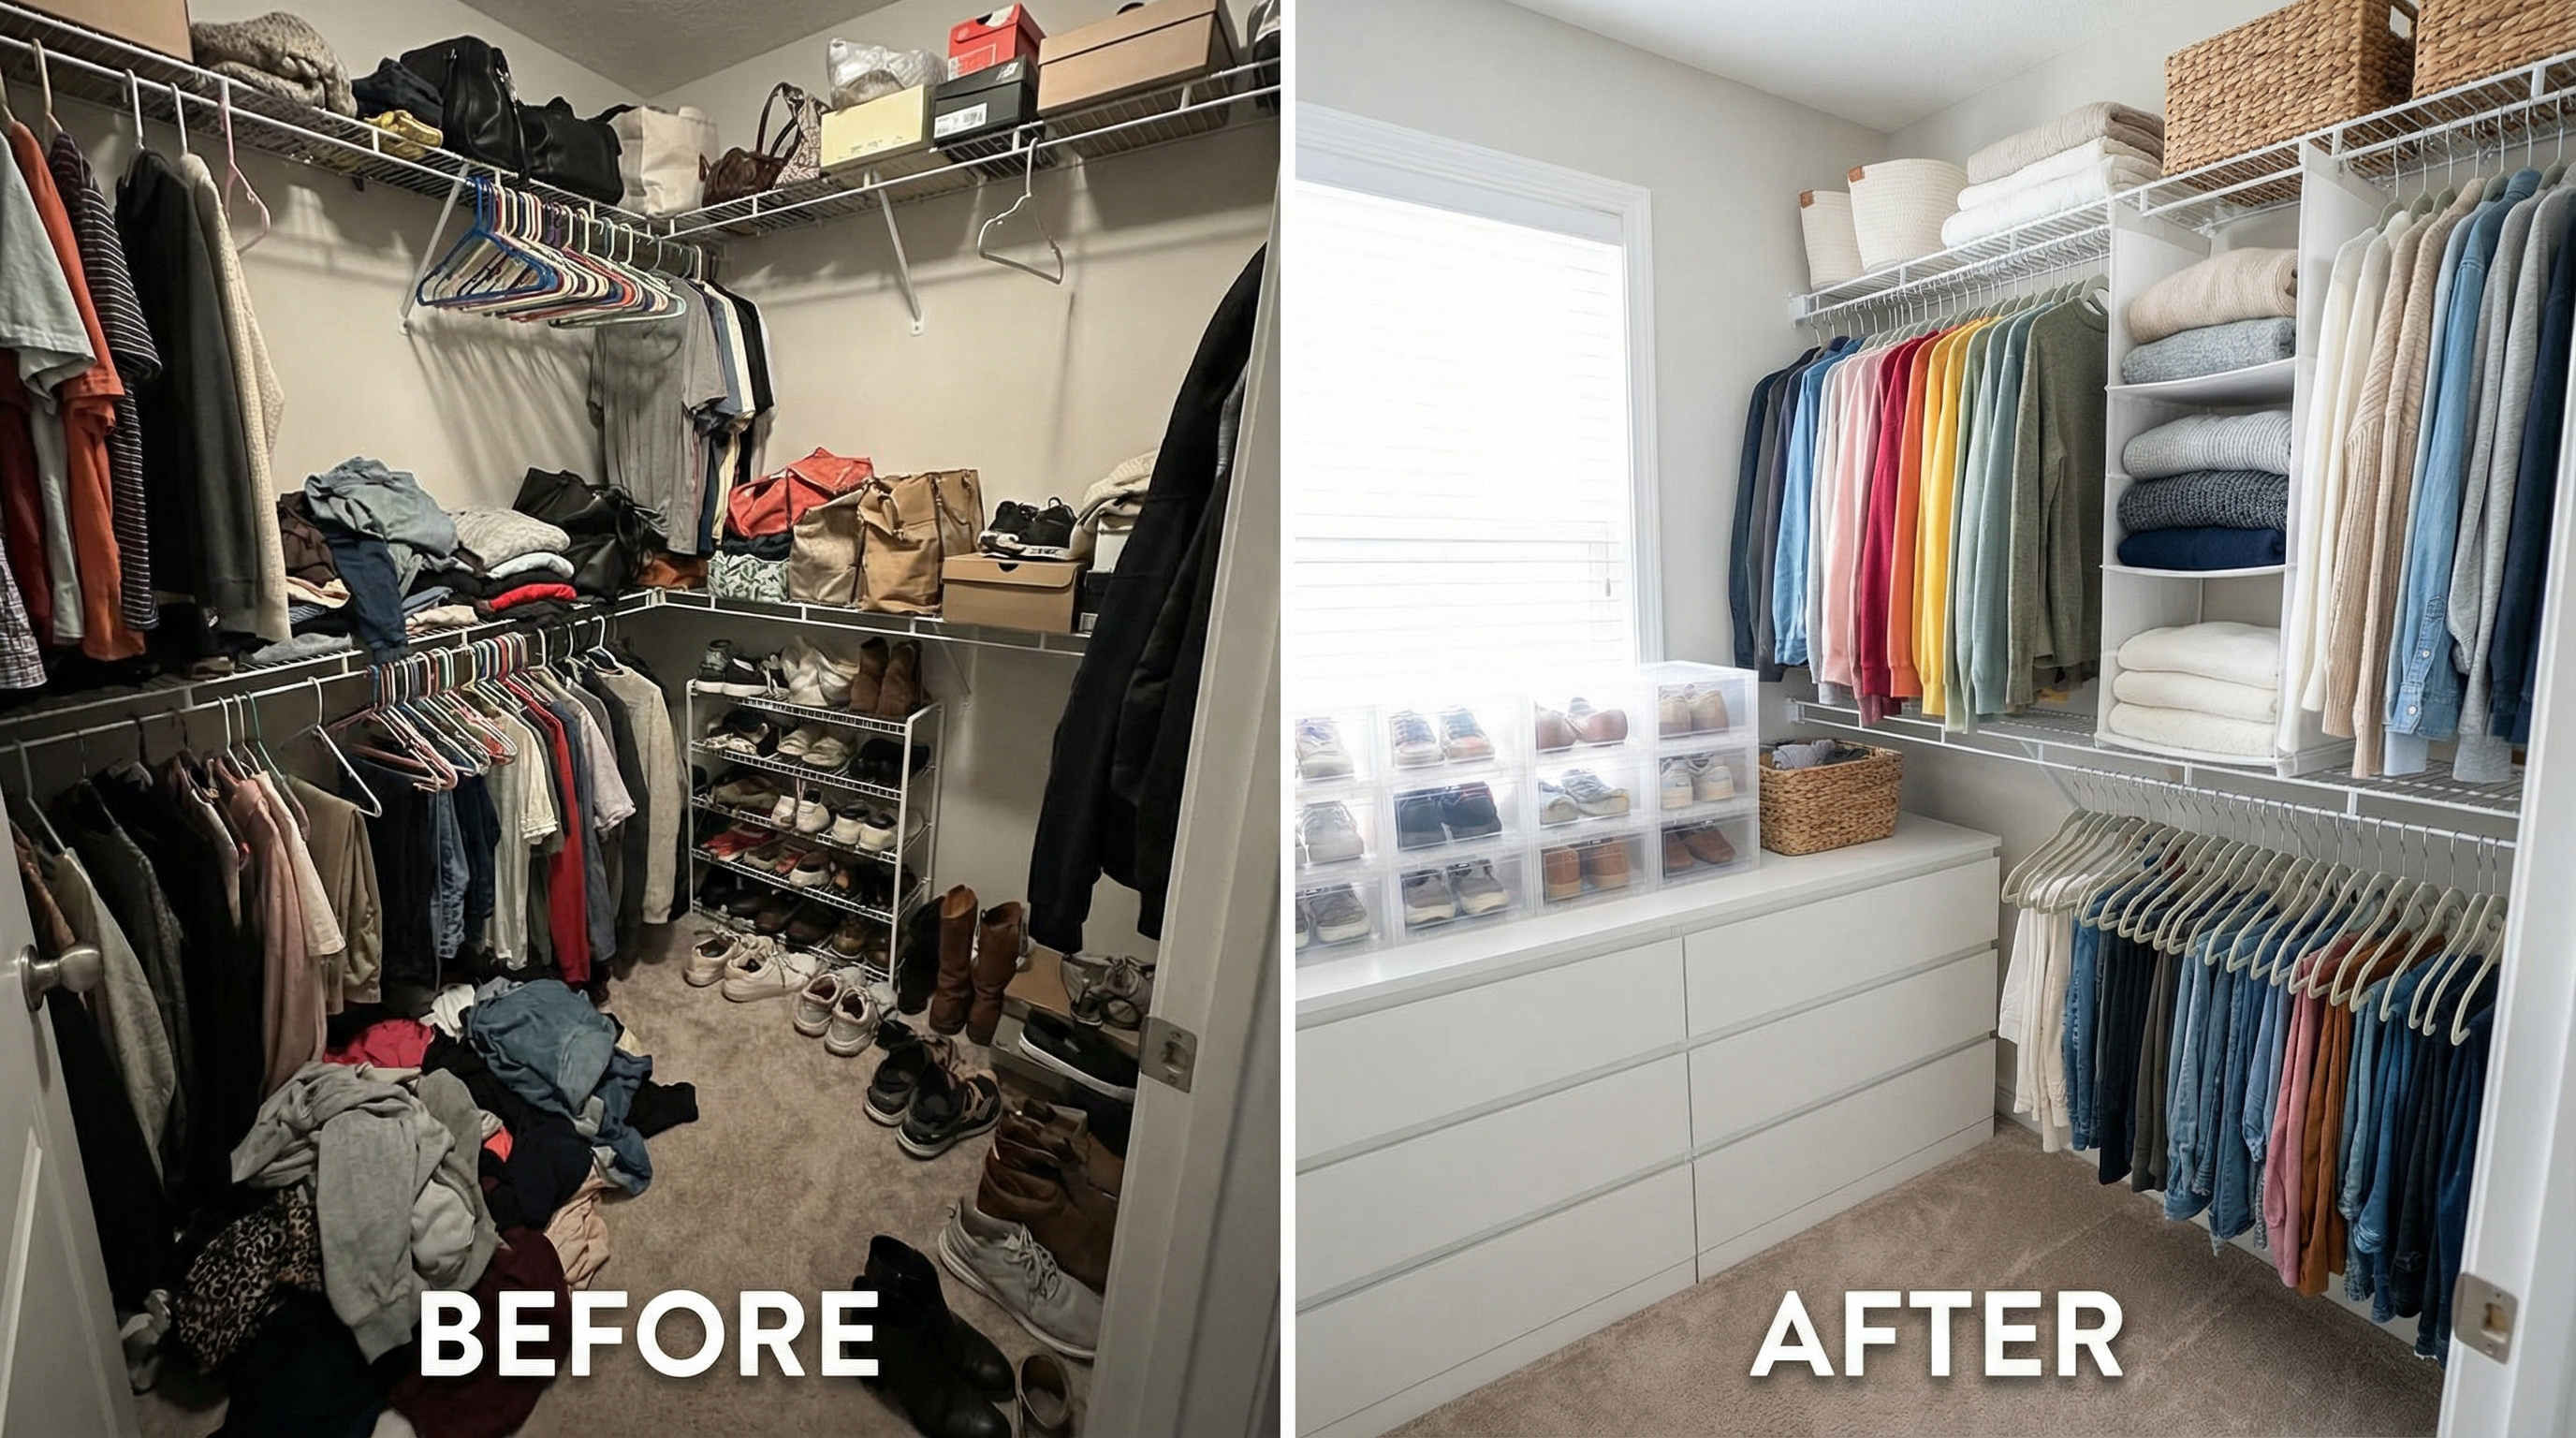
A chaotic closet drains your energy every morning and makes getting dressed feel like a chore. But transforming that cluttered mess into an organized, functional space doesn't require thousands of dollars or a complete renovation. With strategic planning and smart product choices, you can achieve a dramatic closet makeover for just $200—creating a system that not only looks beautiful but actually works for your daily routine. This guide breaks down exactly where every dollar goes and how to maximize your transformation impact. For specific organization solutions and storage ideas, we've got detailed recommendations that complement this makeover approach.
Share This Article

The $200 Budget Breakdown
Before diving into products, understanding how to allocate your $200 makes the difference between a cohesive transformation and a collection of random purchases. This breakdown prioritizes high-impact items that address the most common closet problems: wasted vertical space, bulky hangers, shoe chaos, and lack of drawer storage. Each category targets a specific pain point while staying within budget constraints that actually work for real people.
| Category | Budget | Purpose |
|---|---|---|
| Slim Hangers (50-pack) | $25 | Create 30-50% more hanging space |
| Shoe Storage Boxes (12-pack) | $45 | Vertical shoe organization |
| Drawer Unit (3-drawer) | $45 | Under-hanging storage for folded items |
| Hanging Shelf Organizer | $20 | Sweaters, bags, accessories |
| Shelf Dividers (8-pack) | $20 | Keep folded stacks upright |
| Over-the-Door Organizer | $15 | Accessories, small items |
| Storage Bins with Labels (6-pack) | $20 | High shelf seasonal storage |
| Total | $190 | $10 buffer for tax/shipping |
This allocation focuses on foundational systems that work together rather than trendy accessories that don't solve core problems. The $10 buffer covers unexpected shipping costs or sales tax, ensuring you stay within budget. If your closet already has certain elements (like adequate shelving), reallocate that budget toward more of what you need—extra shoe boxes for a large collection, or additional drawer units for folded clothes.
Step 1: Empty and Assess (Day 1, Morning)
Start by completely emptying your closet—every hanger, shoe, box, and forgotten item shoved in corners. This reveals the actual space you're working with and forces you to confront what you actually own versus what you wear. Lay everything on your bed in categories: hanging clothes, folded clothes, shoes, accessories, seasonal items. This visual inventory shows where your storage needs concentrate and helps you decide what truly deserves closet real estate.
While the closet is empty, clean thoroughly—vacuum corners, wipe shelves, check for needed repairs. Measure your closet dimensions: width, height, depth of shelves, and distance from rod to floor. These measurements determine which products fit your specific space. Take photos of the empty closet from multiple angles; you'll appreciate the before shots once the transformation is complete. This assessment phase typically takes 2-3 hours but prevents costly product mistakes.
Step 2: Purge Strategically (Day 1, Afternoon)
The most effective closet organization starts with owning less. Go through each category with honest criteria: Does it fit? Have I worn it in the past year? Is it in good condition? Does it match my current lifestyle? Create three piles: keep, donate, and trash. Be ruthless with items that don't meet all criteria—a beautiful dress you'll wear "someday" just takes space from clothes you actually use. Aim to reduce your wardrobe by at least 30% for maximum organization impact.
For items you're unsure about, use the "maybe box" method: pack questionable pieces in a labeled box with today's date. Store it elsewhere for three months. If you don't retrieve anything from the box in that time, donate it without opening. This removes decision paralysis while ensuring you don't regret hasty purges. The space you gain from purging is free storage—often more valuable than any product you could buy.
Step 3: Install Hanging Solutions (Day 2, Morning)
Begin the transformation by replacing all existing hangers with slim velvet hangers. This single change creates immediate visual cohesion and frees 30-50% more rod space. Hang clothes by category (work, casual, special occasion) and within each category, organize by color from light to dark. This "rainbow method" makes outfit selection faster and reveals wardrobe gaps—you might discover you own twelve black tops but no navy options.
Install your hanging shelf organizer at one end of the rod for sweaters, bags, and folded items that don't need drawer space. Position it where you can easily see and access contents—typically at eye level on the less-used end of your closet. If you have double-rod potential (space below short hanging items), consider adding a tension rod to double your hanging capacity. This works especially well for pants, skirts, and folded trousers that don't need full-length hanging space. For detailed guidance on maximizing hanging space, see our 12 Small Closet Organization Ideas.
Velvet Hangers 50-Pack
Ultra-slim non-slip hangers with 360° swivel hook and notched shoulders
$22-35
Hanging Closet Organizer (6-Shelf)
Fabric hanging shelves with reinforced sides, 12"W x 12"D per shelf
$18-28
Step 4: Organize Shoes Vertically (Day 2, Afternoon)
Shoe piles on closet floors waste valuable space and damage footwear. Clear stackable shoe boxes transform floor chaos into organized vertical storage while protecting shoes from dust and crushing. Start by sorting shoes: everyday wear at eye level, seasonal shoes on high shelves, special occasion shoes in labeled boxes. Stack boxes 6-8 high along closet walls or under hanging clothes, creating a visual inventory where you can see every pair without digging through piles.
Choose drop-front boxes that open from the front rather than lifting lids—this design lets you access bottom boxes without unstacking the entire tower. Label boxes if your shoes aren't visible through the plastic, using simple descriptions like "black heels" or "winter boots." This system works for any shoe collection size and keeps expensive footwear in pristine condition. The vertical organization reclaims floor space for drawer units or other storage solutions.
Clear Stackable Shoe Boxes (12-Pack)
Drop-front plastic shoe storage boxes with ventilation holes, fits up to size 12
$35-55
Step 5: Add Drawer Storage (Day 3, Morning)
The space under hanging clothes typically goes unused or becomes a catch-all for random items. A 3-drawer unit fits perfectly in this zone, creating concealed storage for underwear, socks, workout clothes, and folded items you want protected from dust. Choose units on wheels for easy access to items behind them, or stackable towers to build custom height configurations. Measure your under-hanging space before purchasing—most units are 12-18 inches deep and 24-30 inches wide.
Organize drawers by frequency of use: top drawer for daily essentials, middle drawer for workout gear or pajamas, bottom drawer for seasonal items or accessories. Use small bins or dividers within drawers to prevent items from shifting into jumbled messes. This concealed storage keeps your closet looking clean even when drawers aren't perfectly organized, unlike open shelving that broadcasts every messy moment.
3-Drawer Rolling Storage Cart
Plastic drawer unit on wheels, fits under hanging clothes, 14"W x 18"D
$40-60
Step 6: Maximize Shelf Space (Day 3, Afternoon)
If your closet has shelving, shelf dividers prevent the inevitable toppling of folded stacks. These simple wire or acrylic barriers create vertical sections that keep categories separated—sweaters, jeans, t-shirts, workout gear. Install dividers to create a "file folding" system where clothes stand upright like files in a cabinet rather than stacking horizontally. This method lets you see every item at once and pull pieces without disturbing others.
For high shelves that are hard to reach, use labeled storage bins for seasonal items, special occasion accessories, or clothes you're storing between seasons. Clear bins let you see contents without pulling them down, while opaque bins create a cleaner visual if your shelves are visible. Group similar items together—all winter accessories in one bin, all summer clothes in another—so you can swap seasonally without sorting through multiple containers.
Wire Shelf Dividers (8-Pack)
Adjustable metal dividers for closet shelves, fits shelves 10-18 inches deep
$18-30
Clear Storage Bins with Lids (6-Pack)
Stackable plastic bins for high shelf storage, 12"L x 8"W x 6"H each
$18-28
Step 7: Utilize Door Space (Day 4, Morning)
The back of your closet door offers 12-16 square feet of unused storage potential. Over-the-door organizers install in seconds without hardware, creating homes for accessories, jewelry, scarves, belts, and small items that clutter shelves and drawers. Choose organizers based on what you need to store: clear pocket organizers work beautifully for accessories you want to see at a glance, while hook systems handle heavier items like bags and robes.
Keep weight balanced to prevent door sagging—distribute heavier items across multiple hooks rather than loading one side. This often-overlooked space can hold surprising amounts without taking up any closet interior real estate. For accessories that tangle easily (necklaces, belts, scarves), dedicated organizers with individual compartments prevent the frustrating knots that waste morning minutes.
Over-the-Door Organizer (24 Pockets)
Clear vinyl pockets for accessories, fits standard doors, no tools needed
$12-22
Maintaining Your Organized Closet
The transformation is complete, but maintaining organization requires small daily habits. Implement the "one in, one out" rule: every new clothing purchase means donating or discarding one existing item. This prevents closet creep where organization slowly deteriorates under accumulating stuff. At the end of each day, spend two minutes returning items to their designated spots—shoes in boxes, accessories on door organizers, clothes on proper hangers.
Schedule seasonal closet reviews every three months. Swap seasonal items between accessible storage and high-shelf bins, purge pieces you didn't wear that season, and assess whether your organization system still serves your needs. Small adjustments—adding another shelf divider, rearranging shoe box stacks—keep the system functional as your wardrobe evolves. The goal isn't perfection but a sustainable system that makes daily life easier.
Budget-Stretching Tips
If $200 feels tight, prioritize the highest-impact items first: slim hangers and shoe boxes create the most dramatic visual change. Add other elements gradually as budget allows, spreading the investment over several months. Shop during major sales events—Amazon Prime Day, Black Friday, back-to-school sales—when organization products often hit 30-50% off. Sign up for price alerts on your desired products to catch temporary discounts.
Consider DIY alternatives for certain elements: repurpose shoeboxes with labels instead of buying clear boxes, use tension rods from the hardware store instead of specialized closet rods, create shelf dividers from sturdy cardboard. These substitutions work temporarily while you save for preferred products. Join local buy-nothing groups or check Facebook Marketplace for gently used organization products—people frequently give away perfectly good storage items after moving or renovating.
For more detailed organization strategies and additional product recommendations, explore our comprehensive guide on small closet organization ideas. If you're working with an especially tight space, our small space solutions offer additional strategies for maximizing every inch.
Before and After: What to Expect
The transformation from chaotic to organized typically takes 3-4 days of focused work, spending 3-4 hours per day. Your before closet likely featured clothes piled on floors, mismatched hangers creating visual chaos, shoes scattered without system, and wasted vertical space. The after reveals color-coordinated hanging clothes on uniform hangers, shoes neatly stacked in clear boxes, drawer units providing concealed storage, and every item having a designated home.
Beyond aesthetics, the functional improvements change daily routines. Morning outfit selection drops from 15 frustrating minutes to 5 efficient minutes when you can see every option at a glance. Laundry becomes easier when clean clothes have obvious homes rather than getting shoved wherever they fit. The mental clarity of an organized space reduces decision fatigue and starts each day with a small win. This $200 investment pays dividends in time saved and stress reduced for years to come.
Common Mistakes to Avoid
The biggest makeover mistake is buying products before assessing your actual needs. That trendy jewelry organizer wastes money if you own minimal jewelry, while insufficient shoe storage dooms the project if you're a sneaker collector. Always measure, inventory, and plan before purchasing. Another common error is over-organizing—creating such complex systems that daily maintenance becomes a chore. The best organization is simple enough to maintain when you're tired or rushed.
Avoid the temptation to keep "just in case" items that clutter your newly organized space. That bridesmaid dress from 2015 or jeans from your college weight aren't serving you—they're taking space from clothes you actually wear. Be honest about your current lifestyle and body, not aspirational versions that may never materialize. Finally, don't expect perfection immediately. Organization systems need tweaking as you discover what works for your specific habits and routines.
Related Posts

12 Small Closet Organization Ideas For Your Bedroom
Transform cramped closet chaos into organized bliss with these clever, budget-friendly storage solutions

Small Space Storage Solutions
Creative storage ideas that maximize every inch of your home
Cozy Bedroom on a Budget
Create a warm, inviting bedroom retreat without spending a fortune