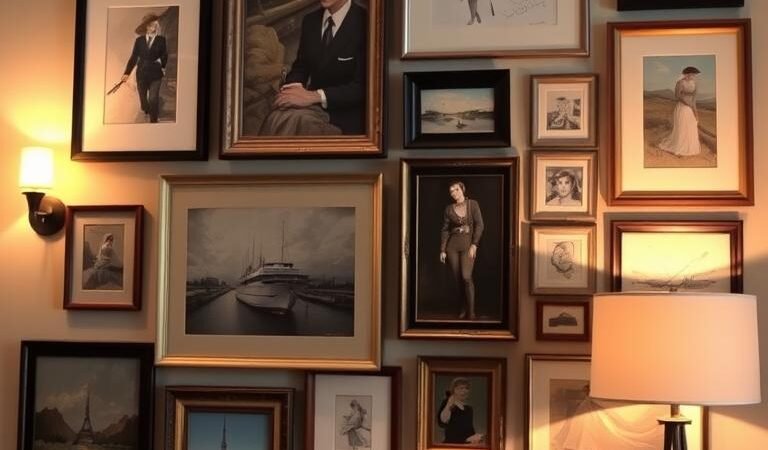
Transforming blank spaces into curated showcases doesn’t require deep pockets—just smart strategies. A well-designed arrangement of frames and artwork brings personality to any home, whether through cherished family photos, thrifted treasures, or printable masterpieces. One inspiring example? An Instagram-favorite setup blending flea market frames, DIY prints, and sentimental snapshots—all for under $50.
Renters and homeowners alike can achieve this look with adaptable solutions like Command strips or classic nails. The secret lies in mixing high and low elements: vintage finds, digital downloads, and repurposed materials. This approach turns walls into visual stories without straining your budget.
Key Takeaways
- Gallery walls personalize spaces affordably using mixed media and creative framing.
- Thrift stores and online resources offer budget-friendly art and frame options.
- Renter-friendly hanging methods like adhesive strips provide flexibility.
- Combining photos, prints, and objects adds depth and character.
- Planning layouts digitally or with paper templates ensures cohesive designs.
Introduction: Why a Gallery Wall is the Perfect Budget Decor Solution
Blank walls transform into storytelling canvases with intentional, budget-conscious decor. One designer’s journey began with a stack of thrifted frames collected over years—each piece holding memories or flea-market charm. Within weeks of moving, her apartment bloomed with personality, proving that a curated display needs neither perfection nor a fortune.

Personalized spaces do more than fill voids; they nurture well-being. Studies show that rooms reflecting individuality reduce stress, unlike sterile environments. Yet many hesitate—overwhelmed by choices, rental rules, or assumed costs. The solution? Start small. Beverly Solomon’s Paris apartment dazzles with layered art, proving maximalism thrives on patience, not price tags.
A $50 goal is achievable. Hunt for frames at thrift stores, swap meets, or garage sales. Pair them with digital prints or DIY projects for a cohesive style. The result? A room that whispers your story, one frame at a time.
How to Create a Gallery Wall: Budget-Friendly Art Display Ideas
Turning bare walls into captivating focal points starts with clever planning and thrifty finds. Follow this 11-step blueprint to blend affordability with artistry—transforming empty spaces into personalized narratives.

Thrift stores are goldmines for unique frames, offering up to 90% savings compared to retail. Pair them with digital prints from Costco or Shutterfly (51% member discounts apply) for a polished yet economical look.
- Texture hacks: Brush Mod Podge onto prints for a painterly effect—secondhand canvases gain new life.
- Layout contrast: Grid designs suit minimalists; organic “eyeballed” clusters appeal to free spirits.
- Seasonal updates: Swap out 2–3 pieces quarterly for fresh energy without redoing the entire arrangement.
Professional designers often use digital tools like Canva to plan spacing, but tactile learners prefer paper templates. Either way, the goal is balance—not symmetry. Anchor larger pieces first, then fill gaps with smaller frames or objects.
For renters, Command strips offer damage-free flexibility. Homeowners might opt for classic nails or picture rails. Both methods accommodate evolving projects, ensuring your display grows with your style.
Step 1: Choose the Right Wall for Your Gallery
The foundation of a stunning arrangement begins with selecting the perfect canvas—your wall. Consider traffic flow, natural light, and room proportions to ensure your display feels intentional, not accidental.

Assessing Wall Space and Lighting
North-facing walls glow with soft, even light—ideal for avoiding harsh shadows. Measure the available space before committing; a 4-foot-wide area suits intimate clusters, while expansive spans demand zoning strategies.
Designer Beverly Solomon advises avoiding high-traffic zones. “Busy corridors risk bumps and distractions,” she notes. Instead, highlight quiet corners or above furniture like sofas or consoles.
Ideal Locations for Small vs. Large Walls
In snug rooms, vertical stacks maximize impact without clutter. Try a trio of frames above a narrow console or bookshelf. For grand spans, break the area into zones with anchor pieces—like a large mirror or statement artwork—flanked by smaller companions.
| Wall Type | Best Approach | Renter Tip |
|---|---|---|
| Small (3–5 ft) | Vertical layouts, 3–5 frames | Command strips for plaster |
| Large (8+ ft) | Zoned zones with anchors | Removable hooks for flexibility |
Mix frame shapes—squares, ovals, rectangles—for dynamism. Renters can test layouts with washi tape before hanging, while homeowners might prefer nails for stability.
Step 2: Define Your Gallery Wall Theme (Or Go Theme-Free!)
A gallery wall’s personality emerges through deliberate theme choices—or the joyful absence of them. Whether you lean toward color-coordinated harmony or a riotous mix of textures, this step transforms random pieces into intentional decor.
Cohesive Color Schemes for Beginners
Monochromatic palettes soothe the eye. A green-themed display might pair Etsy botanical prints with thrifted frames in sage, emerald, and mint. For contrast, try complementary hues like blue and orange—Matisse’s cutouts alongside vintage postcards.

| Scheme Type | Effect | Best For |
|---|---|---|
| Monochromatic | Calm, unified | Small spaces |
| Complementary | Dynamic, bold | Statement walls |
Eclectic Mix-and-Match Approaches
Break rules with variety. Designer Brianna Thomas suggests framing fabric swatches, vinyl records, or children’s drawings alongside thrifted art. “Your home already holds treasures,” she notes. “A seashell collection or concert tickets add texture.”
Chronological displays tell personal stories—graduation photos progressing to wedding snapshots. Texture-focused walls might combine woven baskets, iron sconces, and glossy prints. The key? Anchor with one large piece, then layer smaller items organically.
Step 3: Source Affordable or Free Artwork
Great artwork doesn’t need a hefty price tag—just a keen eye for hidden gems. From flea-market scores to free digital archives, building a curated collection is easier than you think. Start with these three paths to affordable art.
Thrift Store and Flea Market Treasure Hunting
Scour local thrift stores for vintage frames and unexpected finds. Midweek mornings—especially Wednesdays—often yield fresh donations at Goodwill. Look beyond the art aisle; old mirrors or pages from damaged books can become textured backdrops.

Flea markets thrive on haggling. Arrive early for rare prints or late for discounts. Designer tip: Spray-paint mismatched frames gold or matte black for instant cohesion.
Free Public Domain Art Resources
The Metropolitan Museum and Smithsonian offer high-resolution downloads of classic art. National Gallery of Art’s collection includes Van Gogh and Monet—perfect for crisp, legal prints. Print at home or use Costco’s affordable enlargement services.
DIY Art and Personal Memorabilia Ideas
Turn concert tickets, fabric swatches, or children’s drawings into framed treasures. Shadow boxes preserve 3D items like seashells or vintage brooches. For quick projects, Etsy’s $10 digital bundles provide instant themes—from botanicals to abstract designs.
- UV glass protects delicate materials like wrapping paper or magazine clippings.
- Washi tape temporarily tests layouts before committing to nails.
- Mix media: Pair a thrifted oil painting with a DIY watercolor for contrast.
Step 4: Creative Alternatives to Traditional Art
Think beyond canvas—everyday objects become striking decor when framed thoughtfully. Designers often repurpose textiles, memorabilia, and dimensional finds to craft displays brimming with character. These unconventional choices add tactile depth while keeping costs minimal.

Framing Fabric, Wrapping Paper, and Ephemera
Transform favorite scarves or quilt scraps into textile art by stretching them over foam board. This technique preserves delicate fabrics while adding soft texture among rigid frames. For paper-based items like vintage maps or sheet music, laminate before framing to prevent yellowing.
Ephemera tells personal stories. Ticket stubs, pressed flowers, or handwritten letters gain gravitas behind glass. Arrange them in shadow boxes with 1″ spacers to accommodate thicker objects like brooches or seashells.
Incorporating Mirrors and 3D Objects
Strategic mirror placement amplifies natural light. Position them opposite windows to brighten dark corners while creating illusionary space. Odd-numbered groupings of circular mirrors add organic shapes to angular arrangements.
For dimensional interest, consider these options:
- Woven baskets as textural wall sculptures
- Vintage kitchenware like colanders or cake pans
- Surfboards or skateboards for playful energy
Mix glossy and matte surfaces for contrast—a lacquered tray beside a rough linen weave keeps eyes moving. The key is balancing visual weight: anchor one large 3D piece, then surround it with lighter elements.
Step 5: Budget Frame Shopping Strategies
Smart frame choices elevate any arrangement while keeping costs low. Whether hunting for deals or transforming thrifted finds, these tactics turn ordinary frames into design assets.

Ikea and Dollar Store Frame Hacks
Ikea’s Ribba series offers clean lines at wallet-friendly prices. Elevate them with gold leaf edges or textured paint for a luxe feel. Dollar Tree frames shine when paired with poster board mats—cut to custom sizes for a polished look.
- Michael’s B1G2 sales: Stock up during promotions for 50% savings
- Salvage operations: Remove ugly frames from thrifted art to reuse the glass and backing
- Custom mats: Use scrapbook paper or fabric remnants for unique borders
Spray Painting Thrifted Frames for Cohesion
A can of spray paint unifies mismatched finds. Lightly sand surfaces first for better adhesion. Designers recommend this formula:
- 60% primary color (e.g., matte black)
- 30% secondary hue (e.g., brushed gold)
- 10% wildcards (metallics or textures)
For vintage frames, remove dust with a tack cloth before painting. Two thin coats prevent drips. Let dry completely before hanging—patience ensures a flawless finish.
Step 6: Plan Your Gallery Wall Layout
Visual harmony begins long before the first nail hits the wall—it starts with strategic planning. Whether you prefer digital precision or hands-on experimentation, mapping your vision ensures a polished result. These proven methods transform chaotic piles of frames into curated displays.

Floor Layout vs. Paper Template Methods
Let your floor become a temporary design studio. Arrange frames on the ground and photograph them from ladder height—this mimics the viewer’s perspective. For accuracy, use painter’s tape to mark edges directly on the floor.
Kraft paper whispers across walls when precision matters. Trace each frame onto paper, cut out templates, and label them with descriptions. Secure these to your wall with removable tape to test spacing before committing.
| Method | Best For | Tools Needed |
|---|---|---|
| Floor Layout | Organic arrangements | Camera, measuring tape |
| Paper Templates | Grids or symmetrical designs | Kraft paper, scissors |
Balancing Different Sizes and Shapes
Professional designers swear by the 1-3-5 formula: one large anchor piece, three medium frames, and five small accents. This creates rhythm without overwhelming the eye. Odd numbers feel more dynamic than even groupings.
Negative space is your silent partner. Maintain at least 2″ between frames for breathing room. For eye-level placement, center the entire display 57″-60″ from the floor—this aligns with average sightlines.
Mix shapes deliberately. Pair round mirrors with rectangular prints to soften angular spaces. Lay a diamond-shaped frame atop a square one for playful contrast. The key is visual weight distribution, not perfect symmetry.
Step 7: Essential Hanging Tools and Techniques
The right tools transform hanging from frustrating to flawless—no matter your wall type. Designers keep these solutions on hand to ensure displays stay secure while protecting surfaces. Whether tackling plaster or drywall, the approach makes all the difference.

Damage-Free Solutions for Temporary Spaces
Command strips shine in rental homes, holding up to 16 lbs per pair. For best results:
- Use large strips for frames over 12″x12″
- Clean surfaces with alcohol wipes first
- Press firmly for 30 seconds—wait 1 hour for full bond
Beverly Solomon’s rental repair kit includes spackle and sample paint for move-out day. She suggests testing strips on inconspicuous spots first—some plaster walls need extra prep.
Permanent Hardware for Lasting Displays
Homeowners might prefer these traditional options:
| Tool | Weight Capacity | Best For |
|---|---|---|
| Plastic anchors | 10-25 lbs | Small drywall frames |
| Toggle bolts | 50-100 lbs | Heavy mirrors/art |
| Picture rail systems | Adjustable | Frequent layout changes |
No laser level? Smartphone apps like iHandy Level provide accurate measurements. For mixed-media projects, position heavier items near studs using a basic stud finder.
Gallery rail systems offer flexibility—simply slide hooks along the track to rearrange pieces. This way saves time and prevents wall damage during seasonal updates.
Step 8: The Art of Arrangement
Mastering composition turns scattered pieces into harmonious displays. Like a symphony conductor balancing instruments, thoughtful placement creates rhythm without rigid rules. This stage transforms individual elements into a cohesive visual story.
Creating Visual Balance Without Perfect Symmetry
Asymmetry adds energy to any wall. Try these designer-approved techniques:
- Diagonal sightlines: Angle matching color accents across the display
- Weighted clusters: Group three small frames to counterbalance one large piece
- Triptych magic: Split a single image across frames for dramatic impact
The 60-30-10 rule works wonders here. Allocate space to:
| Element | Percentage | Example |
|---|---|---|
| Dominant piece | 60% | Oversized abstract painting |
| Supporting items | 30% | Medium family photos |
| Accents | 10% | Small decorative plates |
Anchor Pieces and Focal Points
Every great arrangement needs a star. These elements command attention:
- Color contrast: A crimson frame among neutrals
- Size dominance: A 24″x36″ map centerpiece
- Texture standout: A woven tapestry beside smooth prints
Position anchors slightly off-center for dynamic tension. Then guide the eye with:
- Graduated color transitions (dark to light)
- Repeating shapes in diminishing sizes
- Directional elements pointing toward key pieces
Remember—the best arrangements feel intentional yet effortless. Trust your instincts as much as the rules.
Step 9: Adding Depth with Mixed Materials
Incorporating shelves and shadow boxes breaks the monotony of flat arrangements. These elements introduce new planes, letting small sculptures or 3D memorabilia share the spotlight with framed pieces.
Floating Shelves and Shadow Box Magic
Floating shelves act as mini stages for decor. Stagger them at angles to create depth illusions—place a ceramic vase beside a framed photo for contrast.
Shadow boxes preserve memories dimensionally. Layer concert tickets, seashells, or vintage keys inside. Use varying depths to highlight prized items.
Frame Style Alchemy
Mix ornate and minimalist frames for character. A gilded Baroque frame beside a sleek acrylic one adds variety without chaos.
- Material contrast: Pair wood with metal or painted finishes.
- Personal style: Let thrifted finds mingle with modern pieces.
- Room balance: Anchor one side with a heavy frame, offset with lighter shelves.
Step 10: Lighting Your Gallery Wall
Light transforms art from static to sensational—strategic illumination elevates every piece. Whether harnessing sunlight or layering affordable fixtures, the right glow ensures your wall becomes a focal point, not an afterthought.
Budget-Friendly Lighting Solutions
LED strip lights offer versatility. Hide them under floating shelves for a soft uplight effect. Battery-operated picture lights clip onto frames, while wired options provide steady brightness for larger rooms.
Matte glass or acrylic reduces glare—an elegant way to showcase art without reflections. Clip-on pendant lights double as spotlights, casting dramatic shadows on textured pieces.
Natural Light Considerations
North-facing light provides even, cool tones ideal for delicate works. South-facing windows bring warmth but risk fading; UV-filtering glass protects cherished prints.
Mirrors amplify existing light. Place one opposite a window to bounce brightness across the space. Warm color temperatures (2700K–3000K) enhance earthy palettes, while cooler tones (4000K+) suit modern monochromes.
| Lighting Type | Cost | Best For |
|---|---|---|
| LED Strips | $10–$25 | Shelves or frame edges |
| Battery Picture Lights | $15–$50 | Renters or temporary spaces |
| Wired Spotlights | $30–$100 | Permanent displays |
Step 11: Maintaining and Evolving Your Gallery
Dynamic displays thrive on change, adapting to seasons, memories, and fresh inspirations over time. Unlike static decor, the best arrangements invite playful updates—swapping a winter landscape for spring botanicals or rotating kids’ artwork as their skills blossom. One designer’s collection grew organically across 12 years, each addition deepening the wall’s personal narrative.
Easy Ways to Update Without Starting Over
Strategic tweaks keep displays feeling current. Pre-wire frame backings during initial hanging for hassle-free swaps later. Designate “anchor zones” for permanent pieces, leaving flexible spaces for seasonal stars.
| Update Type | Frequency | Tools Needed |
|---|---|---|
| Color Palette Shift | Seasonal | Matte inserts, washi tape |
| Memorabilia Rotation | Post-Travel | Shadow boxes, adhesive putty |
| Kids’ Art Showcase | Monthly | Magnetic frames, clipboard hangers |
Seasonal or Rotating Display Ideas
Embrace nature’s rhythm with these refresh ideas:
- Spring: Pressed flowers under glass beside watercolor landscapes
- Summer:
- Beach photography in weathered wood frames
- Driftwood shelves holding coral fragments
- Fall: Vintage book pages with leaf motifs in burnt orange mats
Digital frames blend seamlessly into physical arrangements. Try a 10″ screen displaying vacation snapshots beside matching printed photos—bridging past and present decor.
Common Gallery Wall Mistakes to Avoid
Even the most carefully planned displays can fall victim to subtle spacing pitfalls. The whispers of negative space often lurk beneath claustrophobic clusters or lonely single frames. Professional designers measure success by how pieces converse with both the wall and surrounding furniture.
Overcrowding vs. Underfilling
60-75% coverage strikes visual gold. More feels chaotic; less appears unfinished. Test layouts by photographing arrangements from 10 feet away—if individual elements blur together, edit ruthlessly.
Cluttered corners disrupt flow. Leave at least 4″ between frames and architectural features like doorways. For large walls, zone coverage into distinct clusters with breathing room between.
Ignoring Room Proportion
Scale dictates impact. A 6-foot sofa pairs best with a 4-foot wide display. Low ceilings demand vertical stacks, while vaulted spaces handle horizontal spreads.
| Element | Ideal Proportion |
|---|---|
| Gallery width | ⅔ furniture length below |
| Ceiling height | Vertical layouts if under 8′ |
| Sightlines | 57″-60″ from floor to center |
Blocking light switches or thermostats ranks among frequent oversights. Trace these fixtures on painter’s tape during planning. Mix sizes thoughtfully—anchor with one statement piece, then build outward.
Gallery Wall Inspiration: Before and After
Real homes tell real stories through carefully curated displays that don’t break the bank. Witness how thrifted treasures and clever hacks transform blank spaces into personality-packed vignettes. These transformations prove that vision, not budget, creates showstopping walls.
Real Budget Makeovers from Our Readers
Portland mom Lila Chen turned her bathroom into a botanical retreat using $1 shower curtains. She cut the fabric into panels, stretched them over foam boards, and secured them with double-sided tape. The result? A lush gallery wall for $35.
- Nursery magic: Animal silhouettes cut from wallpaper samples in Ikea frames
- Kitchen charm: Herb prints laminated as wipeable “canvases”
- Washi wonders: Tape outlines mimicking ornate frames on plain walls
| Project | Cost | Key Hack |
|---|---|---|
| Bathroom Botanicals | $35 | Shower curtain panels |
| Nursery Animals | $28 | Wallpaper remnants |
| Kitchen Herbs | $15 | Laminated prints |
Celebrity Home Gallery Wall Ideas to Steal
Interior designer Jenna Lyons layers frames like sedimentary rock—placing some directly on shelves, others slightly behind. This creates depth without overcrowding. Maestri Studio’s celebrity clients often use these pro tricks:
- Shadow play: Lean art against walls for easy swaps
- Mixology: Pair $5 flea-market sketches with inherited oil paintings
- Lighting layers: Clip-on LED spots highlight rotating favorites
The most inspiring gallery wall ideas blend high and low elements. A $20 vintage frame might showcase a museum-quality print, while a child’s crayon masterpiece gets the spotlight beside it. That’s the beauty of personal style—it’s yours alone.
Conclusion: Your Gallery Wall Journey Starts Now
Great design isn’t about perfection—it’s about expression. Begin with three frames and free digital prints. Let your walls whisper your journey, one piece at a time.
Mark seasonal refreshes on your calendar. Swap botanicals for winter landscapes or rotate kids’ artwork. Share progress online—inspire others with your way of blending thrifted finds and personal treasures.
Track spending with a budget template. Over time, layers add depth. Your gallery wall evolves, just like your story.
Trust the process. Make your home uniquely yours. After all, the best spaces reflect life’s layers—not just trends.